Search This Blog

Translate

Welcome

Hi,Thanks For visitin Again If This Is Your First Time Please Don't Forget To Subscribe or Follow us. Fell Free To Share Any Information.Hostgator


25 December 2013

How to downgrade from iOS 7 to iOS 6.1.3 on your iPhone 4

How to downgrade from iOS 7 to iOS 6.1.3 on your iPhone 4 using iFaith

iFaith2
If you’ve an iPhone 4 and have saved SHSH blobs for iOS 6.1.3, then it is possible to downgrade from iOS 7 to iOS 6.1.3 or earlier using iFaith.
We had briefly mentioned this a days back, but we finally managed to successfully downgrade from iOS 7 to iOS 6.1.3, so we thought of sharing the step-by-step instructions for those interested in downgrading.

Some important points before we proceed (please read them carefully before proceeding):
  • iFaith developed by iH8sn0w is only available for Windows.
  • You can downgrade only if you’ve iOS 6.1.3 SHSH blobs. This method should also work if you’ve SHSH blobs for iOS software updates released before iOS 6.1.3 such as iOS 6.1.2 etc.
  • This method currently works only on iPhone 4. It is not possible to downgrade any of the other iOS 7 compatible devices like the iPhone 5, iPhone 4s, iPad 4, iPad 3, iPad 2, iPad mini and iPod touch 5G.
  • If you’re still on iOS 6.1.3 then you should save the SHSH blobs using iFaith.

How to downgrade from iOS 7 beta to iOS 6

How to downgrade from iOS 7 beta to iOS 6


ios-7-logo
If you had upgraded your iOS device to iOS 7 beta to check it out and want to downgrade back to iOS 6, then the good news is that you can downgrade. This is despite Apple’s warning which states that you cannot downgrade back to earlier versions of iOS.


Important points to note:
  • You will be able to downgrade back only to the latest iOS 6.x.x version (which is iOS 6.1.4 for iPhone 5 and iOS 6.1.3 for the remaining iOS devices).
  • Please take a backup of your iOS device to iCloud or using iTunes.
  • Please note that when you downgrade back to iOS 6.x.x, you will be able to restore back to iOS 6.x.x compatible backup and not the iOS 7 backup to avoid compatibility issues.
Please follow these simple instructions to downgrade to iOS 6:

How to Downgrade iOS 7 to iOS 6.1.4 or iOS 6.1.3 via iTunes

How to Downgrade iOS 7 GM to iOS 6.1.4 

or iOS 6.1.3 via iTunes 

How to Downgrade iOS 7 GM to iOS 6.1.4 or iOS 6.1.3

 via iTunes [VIDEO GUIDE]

Downgrade iOS 7 Gold Master or Final release to iOS 6 in five simple steps 


How to Downgrade iOS 7 GM to iOS 6.1.4 or iOS 6.1.3 via iTunes
Apple rolled out iOS 7 Gold Master (GM) to its registered developers via iOS Developer Center (Dev Center) as part of its developer programme, following its big iPhone event on 10 September. The iOS 7 GM is the final developer release (click here to see our tutorial) with build number 11A465 that brings a few notable bug-fixes and feature enhancements over previous beta releases.
However, iOS 7 still lacks a working jailbreak, so those who want to retain their existing jailbreak apps and tweaks should downgrade their iDevice to older versions of iOS 6.
IBTimes UK brings a step-by-step guide to help users restore their devices from iOS 7 GM to stable versions of iOS 6 (iOS 6.1.4 or iOS 6.1.3) via iTunes Backup and Restore function.

Downgrade from iOS 7 to iOS 6.1.4 - 6.1.3 - 6.1.2 - 6.1.1 - 6.1 - 6 - 5.1.1

How To Downgrade From iOS 7 to IOS 6.1.4 – 6.1.3 – 6.1.2 – 6.1.1 – 6.1 – 6.0.1 – 6 – 5.1.1


How To Downgrade From iOS 7 beta To iOS 6.x and IOS 5.x


Step 1) – Download firmware 6.x or 5.x to download IOS page
Step 2) - Now connect your iPhone, iPod Touch or iPad to your computer via the Lightning connector.
Step 3) - Launch iTunes and go into the device summery tab. Now Option click on Mac or Shift click on Windows the Restore button and then select the iOS 6.1.3 or iOS 6.1.4firmware.
Step 4) - You will now simply need to watch your iOS device be restored back to iOS 6.x. If you experience an error simply place your device into DFU mode and then repeat the process from step 3.
Unfortunately it isn’t possible to downgrade from iOS 7 to a Jailbreakable firmware like iOS 6.1.2 even with saved SHSH blobs. The only devices that can downgrade back to iOS 6.1.2 with saved SHSH blobs is A4 devices like the iPhone 4.

How to Jailbreak iOS 4.3.3 or earlier with Jailbreakme

How to Jailbreak Your iPhone With Jailbreakme(iOS 4.3.3 or earlier)


Jailbreaking an older iDevice has been made incredibly simple with the creation of jailbreakme.com. This website will jailbreak your iDevice with minimal effort on your end. Jailbreaking your phone will allow you to use it with other carriers. Follow this guide to get your iPhone jailbroken without any fuss.


Steps


Before Jailbreaking


  1. 1
    Determine what version of iOS you are running. To do this open the Settings app on your Home screen. Tap the General category and then select About. Your iOS version # will be listed next to the Version entry.

    • JailbreakMe DOES NOT support iOS versions above 4.3.3. This means that the iPhone 4S, 5, iPod touch 5, and the iPad 3 are all not supported. Older hardware must be running iOS 4.3.3 or earlier
  1. 2
    Backup your device. Open iTunes on your computer. You will be using iTunes to create a backup image of your phone. You can use this image to restore your device in case the process goes wrong, or you are unhappy with the jailbroken device.
  2. 3
    Plug your device into the computer. In iTunes, click on your device in the sidebar. Choose “Back Up Now” from the options that appear. This will backup your data, contacts, and settings.
    • Turn off the passcode screen lock if you have it enabled. You can re-enable it after the jailbreak process is over.

Start the Process

  1. 1
    Visit the website from the device. The JailbreakMe process happens through the web browser on your device. Open Safari, and navigate to http://jailbreakme.com.
  2. 2
    Make sure your device is compatible. If you do not have a supported device, the JailbreakMe website will inform you that your device will not work. If it is compatible, you will find the option to “slide to jailbreak”.
  3. 3
    Slide the bar to start the jailbreak process. The jailbreak will download and install automatically. Depending on the speed of your connection, this could take up to five minutes or more. Once the process is complete, a message will appear on your device’s screen that says “Cydia has been added to the home screen. Have fun!” Press OK to return to your Home screen.
  4. 4
    Reboot your device. This is not always necessary, but can help to work out any remaining kinks in the jailbreak process.
  5. 5
    Browse Cydia for new apps. Cydia is the App store for jailbroken devices. It is not supported by Apple, but you can find a wide variety of apps and tweaks that you can apply to your jailbroken phone. 


How to Hard Reset an iPhone

How to Hard Reset an iPhone


Like all computers and smartphones , the Apple iPhone occasionally needs a reboot. You can do this by giving it a "hard reset". This does not remove app, songs, contacts or anything else stored on your iPhone. It basically just reboots the phone without following the normal shutdown procedures.


Steps

  1. Press and hold the Home button (big circle below the screen) and the Sleep/Wake button (on top of the iPhone) simultaneously.
  2. Continue holding both buttons until the iPhone shuts off and begins to restart. This will take anywhere from 15-60 seconds.
  • Assuming your iDevice isn't totally crashed and unresponsive, you will be offered the ability to power off at this point. If you take that option, remember to turn your phone back on when you are done. Alternatively, you can ignore the power off request and continue holding continue following the steps below.


    3.    You may let go when you see the silver Apple logo. You have now completed the hard                     reset successfully.


    4.    Don't be alarmed that it takes quite a while to load from the Apple logo to the main                    screen. This is normal.
1.  


    iCloud for Windows 3.0


    iCloud for Windows 3.0 Allows Bookmark Sync for Firefox and Chrome


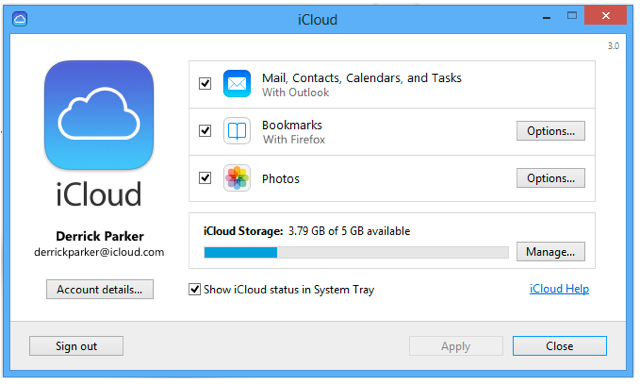
    Along with the release of iOS7, Apple has also updated the iCloud Control Panel for Windows, which is now at version 3.0. iCloud keeps mail, contacts, and calendars up to date between your iPhone, iPad, iPod touch, Mac, and Windows PC, and lets you share calendars and task lists. The new iCloud Control panelhas a redesigned look in sync with iOS7.
    While iCloud Cotnrol Panel 3.0 for Windows continues to offer cross-device mail, contacts and calendar syncing between iPhones, iPads, iPod touches, Macs and Windows PCs, the Windows version now adds support for bookmarks saved in Internet Explorer, Chrome and Firefox.
    iCloud for Windows 3.0

    Setting up App 2 SD


    Setting up your phone to work with Apps 2 SD (A2SD)


    PROCEED WITH CAUTION
    The SDcard will need two partitions, the first Fat / Fat32 & the second Ext2 For the Ext2 partition I wouldn't go higher than 1.5GB cuz you may run into some issues. I was staying around the 500MB / 750MB area & it was working nice. As all the guides I've read state not to exceed the 1.5GB Marker.
    After you have both partitions setup you can install the OS, then it's just a matter of setting up the symlinks & moving the apps over / installing new ones. Now remember it may be best to do a wipe prior to installing this build if you aren't already on the same A2SD Build already.
    Once the OS is installed first thing I would do is from a terminal on the phone / ADB Shell:
    su
    busybox df -h
    If you don't see a row that has /system/sd on it then the process didn't pick up your SDCard. I'd suggest you to re-install / re-format the card.
    Next if you didn't perform a wipe we'll move the data over, run these cmds either via terminal / adb shell:
    busybox cp -a /data/app /system/sd/
    busybox cp -a /data/dalvik-cache /system/sd/ (optional)
    busybox cp -a /data/data /system/sd/ (optional)
    The last two cmds here are optional (they are to move the cache for each app) & some have reported issues when copying these over so if you are having issues I would leave these on the /data partition.
    1 Once your done with the above, power off your phone
    2 Press & hold the Home Button & press Power to boot into Recovery Mode
    3 Once the recovery menu opens & it's showing you JF's custom menu press ALT+X to enter the Recovery Terminal.
    4 Press enter & a prompt should come up with a "#".
    Next enter these cmds:
    mount data
    rm -rf /data/app
    ln -s /system/sd/app /data/app
    rm -rf /data/data (optional)
    ln -s /system/sd/data /data/data (optional)
    rm -rf /data/dalvik-cache (optional)
    ln -s /system/sd/dalvik-cache /data/dalvik-cache (optional)
    reboot
    Again the 4-7 cmds are optional & for the cache only of an app, so if you moved the cache over in the above cmds then on this section you will run them as well.
    You must run the optional cmds in both sections for them to work, or run them in neither!
    During the reboot process your phone might take a while at the android screen since it has to populate the apps tray. If it lasts >5-10 minutes then something likely went wrong. Make sure you did all the steps correctly & if you did try the steps in the recovery terminal section of this tutorial again. If it still doesn't work, post here & we'll try to get it sorted out. That aside, enjoy having your apps on SD card!
    Also I wouldn't suggest you moving the /data/app-private.
    Please Subcribe and post your comments below

    Follow us on